看代码的时候碰到个 System.identityHashCode(obj),没见过,更没用过。
直接看了下 doc,描述如下:
Returns the same hash code for the given object as would be returned by the default method hashCode(), whether or not the given object’s class overrides hashCode(). The hash code for the null reference is zero. Params: x – object for which the hashCode is to be calculated Returns: the hashCode Since: 1.1
意思是说,不管传进去的参数类有没有重写过 hashcode 方法,identityHashCode 都会返回其默认的 Object.hashcode() 返回值。
那么它有什么用呢?这里给了答案:When to use System.identityhashcode() and hashcode() method?
简单来说,当一个类重写了 equal 和 hashcode 方法,它多个实例的 hashcode 是可能返回相同值的,当我需要区分不同的实例时,就可以用 identityHashCode 方法。
在搜索用法的时候发现了另一篇文章,对 identityHashCode 的底层实现也给了说明,是有关 JNI 的。所以我又看了下 JNI 相关的两篇文章,做个备忘。
System.identityHashCode(obj) 与 obj.hashcode() - 简书 (jianshu.com)
使用JNI(Java Native Interface)的总结 - 简书 (jianshu.com)
Jni教程(一)—Linux下jni调用 - 简书 (jianshu.com)
1. 自顶向下 JNI
看 Java 工程源码时,遇到各种 API 都可以在 IDE 里通过鼠标点击进行跳转,但有的时候跳转到 native 方法就没法再往下看了。譬如上边的 identityHashCode 方法,它只有下边这么一个声明,并没有具体的实现。
1
2
@HotSpotIntrinsicCandidate
public static native int identityHashCode(Object x);
其实,它并不是没有具体实现,而是 native 方法都是通过 c 或者 c++ 来实现的。native 方法大体可以这么理解:在 jdk 的 java 代码中定义接口(头文件),然后在 c、c++ 中实现接口(实现头文件中定义的方法)。
要查看 native 方法的实现,就需要下载 jdk 的源码。在 jdk 源码里有各个平台的 c、c++ 实现。源码可以从这里下载:JDK Builds from Oracle (java.net),选择不同的 jdk 版本之后,在 RI Source Code 有源码下载链接。
我下载的 jdk 11,跟 identityHashCode 实现相关的文件路径如下:
1) openjdk/src/java.base/share/native/libjava/System.c,是 Java_java_lang_System_identityHashCode 的实现。(可以看出来 c 中的方法名和 java 中的方法名不一样,转换规则可以参考这里:【转】对于JNI方法名,数据类型和方法签名的一些认识 - InfantSorrow - 博客园 (cnblogs.com))
1
2
3
4
5
   JNIEXPORT jint JNICALL
   Java_java_lang_System_identityHashCode(JNIEnv *env, jobject this, jobject x)
   {
       return JVM_IHashCode(env, x);
   }
上边的方法里调用了 jvm 的 JVM_IHashCode 方法。
2) openjdk/src/hotspot/share/prims/jvm.cpp,给出了 JVM_IHashCode 的实现,它又调用了 ObjectSynchronizer::FastHashCode。
1
2
3
4
5
   JVM_ENTRY(jint, JVM_IHashCode(JNIEnv* env, jobject handle))
     JVMWrapper("JVM_IHashCode");
     // as implemented in the classic virtual machine; return 0 if object is NULL
     return handle == NULL ? 0 : ObjectSynchronizer::FastHashCode (THREAD, JNIHandles::resolve_non_null(handle)) ;
   JVM_END
3) openjdk/src/hotspot/share/runtime/synchronizer.cpp,最终的 hashcode 实现。
1
2
3
4
5
6
7
8
9
10
11
12
13
14
15
16
17
18
19
20
21
22
23
24
25
26
27
28
29
30
31
32
33
34
35
36
37
38
39
40
41
42
43
44
45
46
   intptr_t ObjectSynchronizer::FastHashCode(Thread * Self, oop obj) {
       ...
           hash = get_next_hash(Self, obj);  // allocate a new hash code
       ...
   }

   static inline intptr_t get_next_hash(Thread * Self, oop obj) {
     intptr_t value = 0;
     if (hashCode == 0) {
       // This form uses global Park-Miller RNG.
       // On MP system we'll have lots of RW access to a global, so the
       // mechanism induces lots of coherency traffic.
       value = os::random();
     } else if (hashCode == 1) {
       // This variation has the property of being stable (idempotent)
       // between STW operations.  This can be useful in some of the 1-0
       // synchronization schemes.
       intptr_t addrBits = cast_from_oop<intptr_t>(obj) >> 3;
       value = addrBits ^ (addrBits >> 5) ^ GVars.stwRandom;
     } else if (hashCode == 2) {
       value = 1;            // for sensitivity testing
     } else if (hashCode == 3) {
       value = ++GVars.hcSequence;
     } else if (hashCode == 4) {
       value = cast_from_oop<intptr_t>(obj);
     } else {
       // Marsaglia's xor-shift scheme with thread-specific state
       // This is probably the best overall implementation -- we'll
       // likely make this the default in future releases.
       unsigned t = Self->_hashStateX;
       t ^= (t << 11);
       Self->_hashStateX = Self->_hashStateY;
       Self->_hashStateY = Self->_hashStateZ;
       Self->_hashStateZ = Self->_hashStateW;
       unsigned v = Self->_hashStateW;
       v = (v ^ (v >> 19)) ^ (t ^ (t >> 8));
       Self->_hashStateW = v;
       value = v;
     }

     value &= markOopDesc::hash_mask;
     if (value == 0) value = 0xBAD;
     assert(value != markOopDesc::no_hash, "invariant");
     TEVENT(hashCode: GENERATE);
     return value;
   }
以上就是怎么去看 native 方法的实现。
2. 自底向上 JNI
当我想要自己实现一个 native 方法时,应该怎么做呢?在这部分给出一个最简单的例子。
总共分为两个大步骤:声明接口(生成头文件)、实现接口(编译 so/dll)。
2.1 声明接口
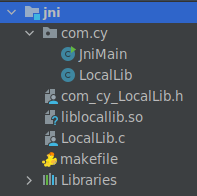
先创建一个最简单的 Java 项目,结构和代码如下,这一步只关注 java 代码,先不用关心 .h .so .c 和 makefile。
![jni]()
LocalLib 中声明了 sayHi 方法,加载了 locallib 这个我们将在后边生成的动态链接库。
1
2
3
4
5
6
7
8
package com.cy;

public class LocalLib {
    static{
        System.loadLibrary("locallib");
    }
    public static native void sayHi();
}
JniMain 调用了 LocalLib 的 sayHi 方法。
1
2
3
4
5
6
7
package com.cy;

public class JniMain {
    public static void main(String[] args) {
        LocalLib.sayHi();
    }
}
在 src 目录下,也就是 com 同级的目录下使用 javah 命令生成头文件。
1
$ javah com.cy.LocalLib
执行完以上命令,会在同一目录下生成 com_cy_LocalLib.h 头文件,其内容声明了 sayHi 方法。
1
2
3
4
5
6
7
8
9
10
11
12
13
14
15
16
17
18
19
20
21
/* DO NOT EDIT THIS FILE - it is machine generated */
#include <jni.h>
/* Header for class com_cy_LocalLib */

#ifndef _Included_com_cy_LocalLib
#define _Included_com_cy_LocalLib
#ifdef __cplusplus
extern "C" {
#endif
/*
 * Class:     com_cy_LocalLib
 * Method:    sayHi
 * Signature: ()V
 */
JNIEXPORT void JNICALL Java_com_cy_LocalLib_sayHi
  (JNIEnv *, jclass);

#ifdef __cplusplus
}
#endif
#endif
这样程序主体搭建和 native 接口声明就完成了。
2.2 实现接口
实现接口就是实现 com_cy_LocalLib.h 头文件里声明的方法。
创建 LocalLib.c 文件,在其中包含 com_cy_LocalLib.h 头文件,并实现 sayHi 方法。
1
2
3
4
5
6
#include <stdio.h>
#include "com_cy_LocalLib.h"

JNIEXPORT void JNICALL Java_com_cy_LocalLib_sayHi(JNIEnv *, jclass) {
    printf("Hi World!\n");
}
创建 makefile,不同平台的写法不同,下边是 Linux 的写法。
1
2
3
4
5
6
liblocallib.so : LocalLib.c
	g++ -o $@ $+ -fPIC -shared -I/usr/lib/jvm/java-11-openjdk-amd64/include -I/usr/lib/jvm/java-11-openjdk-amd64/include/linux

.PHONY : clean
clean :
	-rm liblocallib.so
生成 so 动态链接库(Windows 下是 dll),生成动态链接库需要相应的工具链:make 和 g++。Ubuntu 通过命令:
sudo apt install build-essential进行安装。1
$ makemake 之后会在目录下生成一个 liblocallib.so 的文件,这个就是包含了 sayHi 方法的动态链接库。
2.3 运行
在 idea 里运行的话,把 so 的路径加到 vm 参数 -Djava.library.path 就可以了,譬如:-Djava.library.path=/home/enchyaa/Coding/jni/src。
1
2
3
4
5
6
7
8
9
/usr/lib/jvm/java-11-openjdk-amd64/bin/java
-Djava.library.path=/home/cy/Coding/jni/src
-javaagent:/opt/idea-IC-212.4746.92/lib/idea_rt.jar=45911:/opt/idea-IC-212.4746.92/bin
-Dfile.encoding=UTF-8
-classpath /home/cy/Coding/jni/out/production/jni com.cy.JniMain

Hi World!

Process finished with exit code 0